For PhotoFinishing, mobile apps like Instagram, FxReviews, and PicSay have re-invigorated a revolution started by such web photofinishing tools as Picnik [see here the new Picniks since Google closed shop ]. The idea was to add visual fun to images which was inspired originally by Photoshop plugins like Impressionist or Virtual Painter or Flaming Pear. But it took the online World to inject new vigor into the photoart finishing scene.
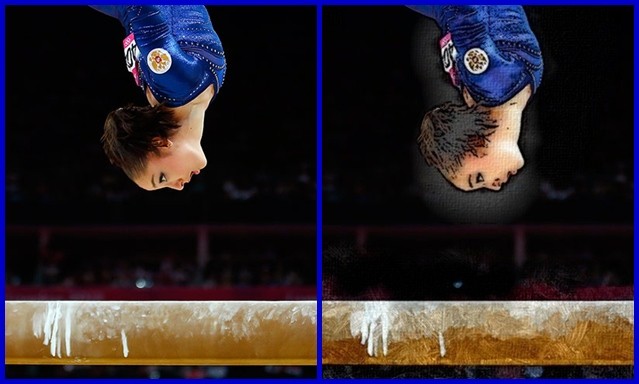
Now a new free PC-based tool, FotoSketcher, picks up that tradition and provides an artistically savvy and fun tool for photo finishers to work with. Lets first take a look at the before and after of what can be done with FotoSketcher:

From Olympic Pictures at Pinterest, oilpainting on beam, watercolor on athlete.

Bloom enlivened with textured watercolors around and smooth painting in the center.
FotoSketcher certainly can give your images a new look – and in the flower case, I think a better look. Here is how it works.
Using FotoSketcher
Often I use slightly out of focus or other `focus-challenged`images for possible rescue with artistic impressionist afforeded by FotoSketcher or Photoshop plugins like Virtual Painter or PaintAlchemy.Look for images that have strong form and design but are tainted by blur or `same-old`drawbacks. FotoSketcher is so easy and fun to use that I now think differently – what shots would like witha touch of FotoSketcher magic.
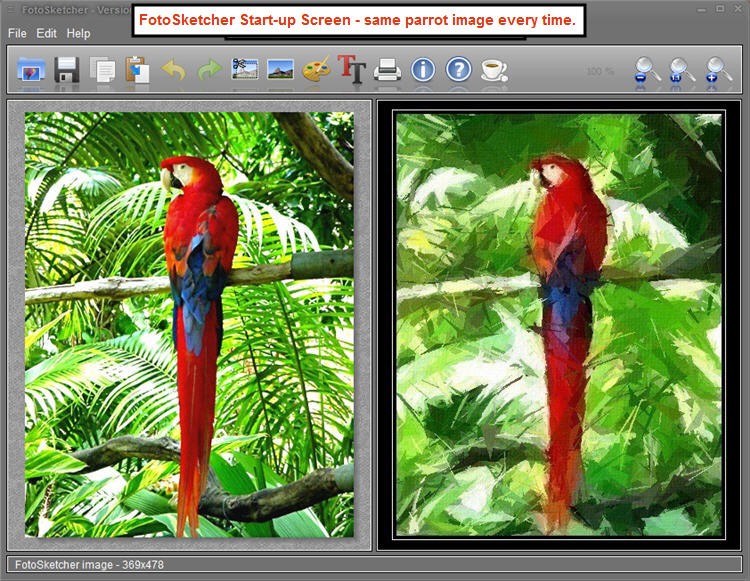
FotoSketcher is a stand alone program and is not available in .8bf Photoshop plugin format. You can download it here for use on a PC – there is a Mac version in the works but no beta is availalble yet. the download is a modest 8.5MB and it takes about 2 minutes to install the program after the free download is complete. Here is what you first see on startup – the Fotosketcher parrot image ^this will first appear every time on startup:

The key to using FotoSketcher is the iconbar because all FotoSketcher actions can be easily controlled here. For example, the first four icons control the image loading and usage options:
1) the blue icon is for opening an image file for FotoSketching:
2)the black diskette icon saves the processed image in the right screen to a user named file and selected directory;
3)the third icon, a double sheet of paper, copies the current right image to the clipboard;
4)the fourth icon, a clipboard, pastes the image from the clipboard into your favorite photo-editor like PhotoShop or Photoscape or whatever;
The next two icons are the Undo and Redo buttons which make trying things out in FotoSketcher easy to do and so much fun;
5)the yellow Undo Icon reverses the last operation for each click on the button;
6)the green redo button instantly restore the last Undo.
The next 2 buttons are key to doing the final edits before painting your image.
7)the icon of an image with scissors in the upper left corner triggers an image cropping operation. Use this to crop the source image on the left by dragging the mouse with its plus target icon over the area of the of the image source you want to crop to. A popup asks to ok or cancel the crop. If you have already started painting and want to crop the image and preserve all the painting operations done so far then do the following. Crop the right painted image; then hit the F12 key to bring it over as the new source image. This will preserve all the painting done so far.
8)the icon of the mountain scape image allows you to chnage 5 properties of the image source:
– i) Luminosity or brightness-darkness control;
– ii) Contrast setting;
– iii)Saturation both positive or negative desaturation;
– iv)Sharpness ;
– v)Simplification or curve smoothing function.
Again, these image changes are best applied before starting to paint. But like cropping, these property changes can be applied to the painted image and then by clicking the F12 key transferred back over to be the new source image. So these are the basic functions; now for the painting fun.
The Pallette Icon Unleashes FotoSketcher Painting Fun
There are two ways to paint in FotoSketcher – Draw over the complete image or use the Manual option to paint specific areas of the image source. The screenshot demonstrates Draw-ing over the entire image:

This shot shows what happens after the user clicks the Draw! button – the entire image source is redrawn using the selected Drawing Style, Colored Dots into the right hand image target. . At the bottom of the popup window there is a preview of how the current parameter settings will look when applied to the image source by clicking the Draw! or Manual Brush button. Note for the Colored Dot style there are five parameter setting. Try sliding the parameter setting around. Resetting the Maximum or Minimum radius wil generate major changes in how the effect looks.
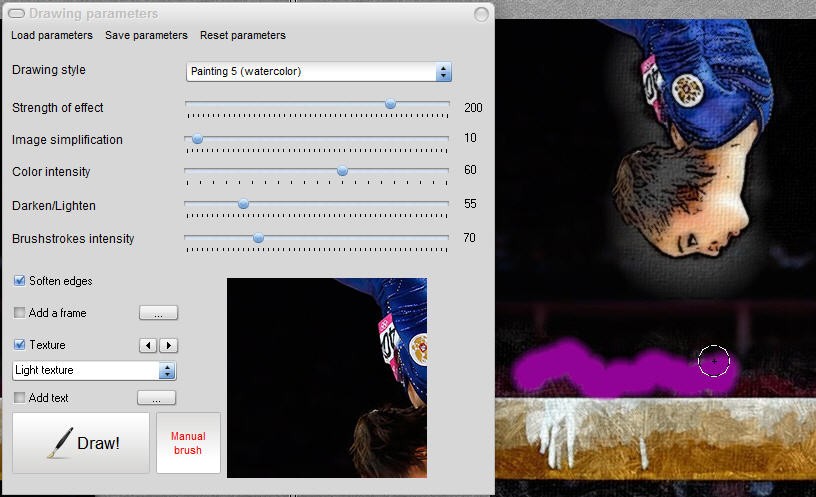
Remember that the Udo or CTL-Z will quickly reverse the effect applied so it is easy to try a number of different parameter setting to get your customized effect just righ. But there is more. By using the Manual Brush button, one can paint on a complete different effect on the image. as seen in the screenshot below.

Note the purple stroke – that will be transformed into a watercolor stroke in just the areas that have been manually painted in. The balance beam bar below has been previously brushed in using the Oil Painting style. A Cartoon styling was applied to the athletes face and body. So by using the Manual brush it is possible to apply several brushs styles to the same image.
Here are the image styles to choose from:
– 5 Pencil Sketch styles for both color and B+W
– 2 Pen and Ink styles which are completely B+W
– 2 Oil Painting sty;les
– 2 Color Cartoon styles
– 4 special filter Painting Styles
– 1 Watercolor style
– 2 special brushstroke Painting styles where users get to load in a their own custom paint brush image to be applied to the image source
– 8 special Painting styles from Pixelation to Vintage Photo.
In sum there are a lot of options for having sketching fun in FotoSketcher. But there are two more styles worth noting.
First, there is the Merge Image Source and Results Image style which is equivalent to the Fade command in Photoshop. This allows user to fade back the Results image using the Source image as the blend target. This is extrememly useful. The second style is Frame, Texture and Text-only style which when coupled with the Paintbrush Popup and the Manual button also allows fading the image back to the original source in selected brushed in areas.

The screenshot shows the reouch brush that pops up whenever Manual Brush is chosen. By using the first slider in the retouch popup, users can change the diameter of the brush for retouching. By using the second slider users control the intensity in which the effect will be appleied. Well in the case of the Frame, Texture, and Text only style, this means the original image source will be blended in with results image – voila a way to selectively fade results with brush strokes.
There are a number of other options, but this is the essence of the FotoSketcher program. Now only one question remains – can you get great results with FotoSketcher. I will let readers be the judge of that:
Now there are obviously going to be various questions. Like why cant one stop the dramatic styling by right clicking on the results image. Or why cant one do all the manual painting stroke without triggering the repaint when one picks up the mouse. Instead with a right-mouse click allow erasing any area previously painted. Then when the brush painting is just right, a user double-clicks on the results image or re-clicks the Manual Brush button initiating the application of the effect. But really, for the price of a donation of a cup of coffee, why quibble. This free program is an absolute delight to use.
