Ye editor is on the look out for an Adobe Photoshop replacement. Recently a colleague recommended Affinity Pro citing the fact that the program runs on both Mac and Windows, has no subscription fee like Photoshop, and has a “ton of photo editing features”. A promise to take a look was made a few weeks ago, and having to do some cropping and tone corrections to quite a number of PixofToronto pictures, the time to tryout Affinity Pro seemed appropriate. What I saw with Affinity Pro tone corrections was to say the least, “very positive”.
Working with Affinity Pro Develop Persona
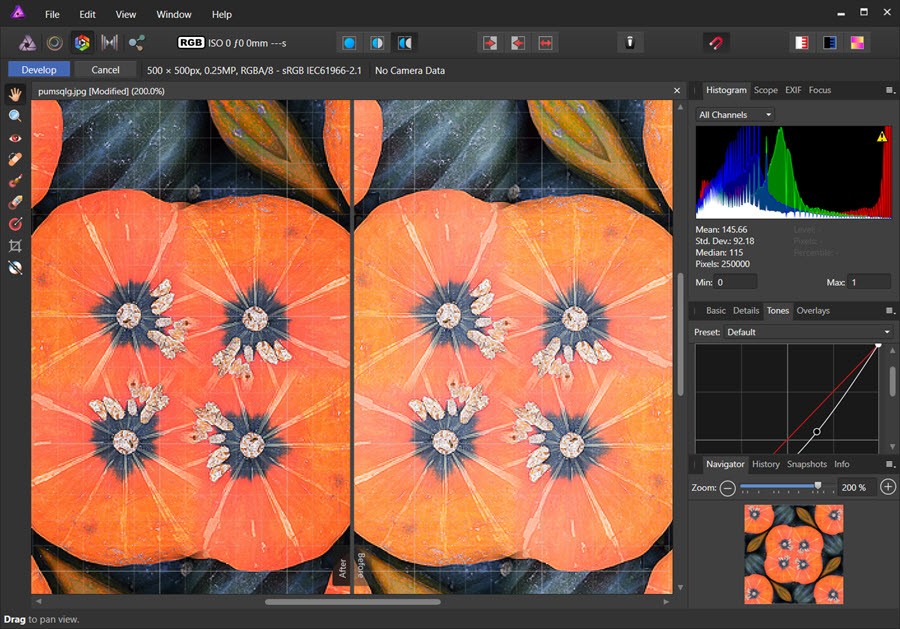
Like other Photo editors Affinity Pro provides special modes or personas to simplify the program interface for specific photo editing tasks. In the case of Develop Persona, Affinity Pro hides many of the Edit Tools and ports some of them over to the Studio. A screenshot shows the interface transformation:


Now this frequent use of photo-editors loves the use of before and after display of changes, especially for color, tone and exposure. As you can see from the above screenshot, there are two dual screen preview modes – the cut-in-half mode shown above and the split mode shown in the partial screenshot below:

This combination of a full tab of Basic edit functions block coupled with dual screen preview display really accelerates the photo editing workflow. Paint Shop Pro pioneered dual screen preview but users had to turn it on and off within each filter.
The Affinity approach allowing users to turn on your choice of dual screen before -and-after preview makes the Develop Persona that much more productive.
Add to this the excellent grouping of basic tonal edits with Exposure having Exposure, Blackpoint and brightness; Enhance having Contrast, Clarity, Saturation and Vibrance; White Balance with Temperature and Tint; and Shadows and Highlights with adjustment to those two prperties. A solid working set.
Two cautions. First, you must save the Develop Persona setting to preserve all the changes. Second, the for each basic edit you must leave the item checked. For example, if you remove the Enhance check, then the Enhance change is removed from the image [but the setting values are remembered and if you reclick on the Enhance settings, the changes are restored.
There are three more Personas for working with Affinity – Tone Mapping which is an even more simplified version of the Develop Persona, Liquefy Persona which emulates Photoshop’s Liquefy feature, an Export Persona which enhances Affinity’s export function.
Summary
Affinity Pro starts out well in our tests for a Adobe Photoshop replacement. The program is reasonably fast, has a wide range of basic photo edits, and with Develop Persona makes basic photo edits workflow a pleasure. Good start.
